Saturday, July 30, 2011

Paper Cutz Challenge #102- Under the Sea!


Hey everyone! Sorry, I'm late posting. Trying to get these kiddos ready for back to school, getting ready for a wedding next weekend, a birthday party that I'm making the invites for, and I had to drive my daughter to go babysit unexpectedly last night. These are the days when I really wish I was more organized. You know.....one of those moms who gets everything done, whose hair is always fixed, and whose house is always clean and tidy. I am totally NOT that person. I'm lucky to get a couple of things on my "to do" list done, hair is usually in a messy ponytail, and currently my house looks like a tornado hit it.....sigh. Anyway, I did not make it to putting up my post yesterday and I apologize. It's a great challenge that Mary has picked for us.
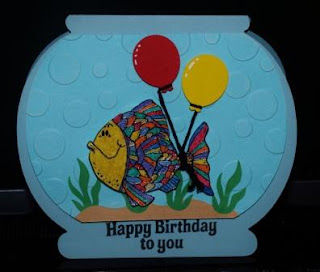
Under the Sea......anything that you might find in the ocean. Fish, seahorses, shells, mermaids, anything. Have fun with it and post it on the Paper Cutz Challenge blog for a chance at a prize. For my card, I decided on a Fish Bowl card. It was originally going to be an ocean scene instead, but I couldn't get the layout like I wanted, so I decided to go with the shaped bowl. I used a Stampin' Up set that I had for the fish and stamped it with VersaMark and used black embossing powder. I colored the fish with glitter gel pens. I punched out the balloons with a balloon punch from The Paper Studio. The fish bowl and seaweed are from Create-a Critter and the sand was cut freehand. I cut a smaller layer of a bowl and trimmed off the top and bottom to make the water. I ran that through a Sizzix folder that came in a summer set. I pop dotted the balloons and the fish onto the card and stamped the sentiment at the bottom. After I snapped the pic of my card, I added white gel pen highlights to the "bubbles" made by the embossing folder. I really thing that gave the card more "pop" than what it looks like here.
So, that's my card for this week! Be sure to put yours on the PCC blog. I can't wait to see what you come up with! Thanks for visiting my purple playroom! Have a great weekend!
Lisa P.

Friday, July 15, 2011

Paper Cutz Challenge #100....The sky's the limit!!!


Hello everyone! I have a problem that I'm hoping someone can help me out with. I have been trying to leave comments on some of your blogs and everytime I try to enter it, it sends me to sign into my google account, which I do. Then when I go back to comment, it does the same thing, so I can't leave comments for anyone. Am I doing something wrong or does anyone have any other ideas for me? I'm stuck. I just want you to know that I am trying to participate on your blogs, too.....I'm just having issues! I am not a computer person, can you tell?? LOL!

OK, onto business! PCC challenge #100.....can't believe it! Mary was nice enough to let her DT come up with theme ideas and mine was chosen this time! Woo hoo!!!! I chose "the sky's the limit". Anything that you might find in the sky.....birds, planes, super heros, fairies, aliens, sunshine, hot air balloons, stars, moons.....you get the picture! Get creative and see where your imagination takes you! Then link it up on the PCC for your chance at a prize at the end of the month.


Originally for my project, I had decided on a card for every season. Obviously, I only posted one card this week. I ran out of time. Yesterday was CRAZY around here! My youngest left for church camp this morning, and let's just say we weren't exactly prepared yesterday. See, I told you I am unorganized and bad with managing my time wisely!! Anyway, the other cards will keep for another time. I decided that my thing in the sky would be clouds and raindrops. It is hotter than heck here in Arkansas, so I have got RAIN on the brain right now. We got a little the other day, but I would love to get more, because I am dying in this heat!! Yuck! I also have had a pretty cruddy week anyway, so I decided on this sentiment, which I LOVE! I used the "joy fold" technique for this card. The carts that I used are "Hello Kitty Greetings" for the rainbow and I don't remember which one I used for the clouds. I just found a cloud on my Gypsy, then I fooled around with the measurements until I liked how it looked. The kid stamps are from Stampin' Up and the sentiment was done on my computer using the "Garfield" font. P.S. I know that isn't and it's should have apostrophes in them, but this font doesn't make them. I meant to draw them in before I took the pics, but forgot, and now it's bugging me! Can't wait to see what you all come up with! Thanks for stopping by my purple playroom!

Friday, July 8, 2011

A New Paper Cutz Challenge.....and a Winner!!!


OK, sorry I am so late posting tonight, but today is my 16th anniversary to my wonderful hubby, Erik, so we went out to dinner (with the kiddos, of course). I am finally getting some downtime in my purple playroom to relax a little. So, first things first. Thank you ALL so much for participating in our first blog hop at the PCC. It was so much fun and I am so excited to have some new followers! I hope to gain even more in the future and have more give-aways and possibly (yikes!!!) a future video tutorial or two. That terrifies me because I hate my voice on tape, but I think it would be fun, so we'll see. Anyway, I'm very new to all of this blog candy and stuff so please bear with me. I really wish I could give you all a prize, but that's not how it works. What I did was write everyone's name down on a piece of paper, fold it up and put it into a box. I called my youngest into my craft room and he drew a name for me. The winner is............

craftaholic!!!!!


Congratulations! I will contact you to get your info!


So, now onto our new challenge for the week. This was a fun one for me, too! Paper Cutz Challenge #99 is to use a Cricut cut, hand stamped or digital stamped image of an ice cream cone or sundae, a popsicle, or a milkshake. You may use any color that you like and it may be a card, layout or other paper project. Enter it at PCC for your chance at a prize. Now, for my cards, I only knew for sure that I wanted it to be a grape popsicle. I love the popsicle cut on my Simply Charmed Cricut cartridge and I love purple (obviously). Kind of funny that I hate grape popsicles, but I digress. Anyway, I could not decide on a layout or anything, so I just played around all day Thursday and ended up with three different cards. The only things I kept the same were the colors, the cut of the popsicle and the Sizzix embossing folder. I even tried out three different techniques on my popsicles to see which effect I liked the best. On the "You're so sweet" I clear embossed the popsicles. On the "Sweet Birthday Wishes" I used Diamond Glaze on the popsicles, and on the final one, I simply drew on highlights with my white gel pen. Another cool thing that I tried on the "You're so sweet" card was that I made the straight glitter lines on the card with the red sticky strip tape. I think this came out really cool and was very excited that it actually worked. I'm always trying to come up with new ways to use my products and this technique has definite possibilites! I added the I-Rock gems as an afterthought. I can't wait to see the projects you guys come up with! This next week, I am going to do my very best to get by all of your blogs and check them out and become a follower.


************************************************************************************

One last thing, I have a small giveaway that I want to do for this week. So, leave me a comment and let me know: 1. Which of my cards do you like best? 2. What is your favorite summer time cold treat? Are you a popsicle person or an ice cream lover? Let me know and I will pick a winner next week. The winner will receive a small popsicle stamp and a set of white cards and envelopes that are all ready for you to embellish! Good luck!

Wednesday, July 6, 2011

An Update on the Giveaway!


Hey, everyone! Hope you all had a wonderful weekend! First, I have to admit something to you all.....I am not a great time manager, I'm a little unorganized, a bit forgetful, and a big time procrastinator. I like to tell my self that it's because I'm such a creative thinker. You know, we have so much going on in our minds all the time that we have trouble keeping track of everything. Yeah.....THAT'S what I tell myself! LOL!! Anyway, I kept meaning to get a pic of the blog candy on here, then I started trying to straighten my craft room so that the picture wouldn't show how messy it is in here. Well, that led to me going through everything in here trying to organize stuff and now it looks like a bomb went off. See what I mean? I'm easily distracted! I also meant to get by everyone's blogs that commented here and look at your projects and become a follower, if I haven't already. I apologize for dragging my feet and I will try to do better. I honestly appreciate each and every one of you that took the time to stop by here and become followers of my blog! Thanks so much!

Anyway, I will draw for the blog candy tomorrow and post on Friday when I post my new Papercutz Challenge project for the week. It's a great challenge, everyone, so be sure to play along with us! I wanted to give you a chance to see exactly what the blog candy will be, though, so I added a picture and a list of what's up for grabs. I'm going to try to start doing more giveaways here on my blog, so stay tuned!

Blog candy:

1 Xyron 1.5 inch create-a-sticker

1 package textured cards and envelopes

3 packages of bling (pearls and diamonds)

4 Sakura Gelly Roll pens (1 metallic silver, 1 metallic gold, 1 white, and 1 Clear Star)

1 stamping block

17 assorted clear stamps (some are sets, some are singles...yes, I have a stamp addiction and sometimes accidentally buy duplicates, so I decided to pass them on to a lucky winner!)


Good luck, everyone!

Hugs!

Lisa P.

Friday, July 1, 2011

Paper Cutz Challenge Star Spangled Blog Hop!


Welcome to my purple playroom everyone and Happy 4th of July weekend! I am so excited for my very first blog hop! If you came from Mary's page at the PCC, then you are going in the right direction! Otherwise, go back and start here.


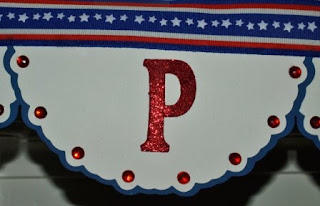
Our project for this week was to make a banner for the 4th of July. Now, I usually don't make big projects, only cards, so I was a little nervous about this one! I just decided to take each piece of my banner one step at a time and work from there. Mary wanted lots of bling, so I decided that I would use glitter on my letters and my red bling for trim on the banner pieces. I used my Elegant Edges cartridge for my banner pieces. I chose a scalloped circle that I liked and cut it out at 7 1/2 inches, then cut a shadow layer from blue. I cut these circles in half and layered them. I cut my letters at 3 1/2 inches, I believe and ran them through my Xyron sticker maker, then peeled off the backing and sprinkled on the red Martha Stewart glitter. I LOVE my Xyron for glittering big areas and for flocking. I love it so much that I think that EVERYONE should have one, so I am giving one away as part of my blog candy! I have a breast cancer awareness Xyron that I will be giving away, so be sure to become a follower of my blog and leave me a comment and a way to contact you. On Monday, I will draw a winner.


Now, back to my banner. Once I put the letters on the banner pieces, I laid them all out on the floor and unrolled a whole roll of patriotic wide ribbon that I got at Walmart. I centered it onto my banner and glued it with Aleine's glitter and gem glue. I added the yellow ribbon that I cut from Stand and Salute as a reminder of all of our men and women currently serving overseas. I am an Air Force wife and my hubby has missed more holidays than I care to remember, so we totally understand and appreciate the sacrifice that these brave people make for us! Let's all remember them this weekend!


Thanks so much for joining me for the blog hop! Don't forget to comment and follow at a chance for my blog candy! Saturday, I will try to put up a post showing what I will be giving away. Truth is, I'm not completely sure what I'll include! Definitely the Xyron, a set of pre-cut cards and envelopes, some clear stamps, a couple of Gelly Roll pens and some bling! Lots of goodies! And also remember that Mary is giving away candy, as well at Paper Cutz! Your next stop on this blog hop will be:


Thanks again for visiting! Have fun on this hop and don't be a stranger!


Hugs!


Lisa P.

Friday, June 24, 2011

Paper Cutz Challenge #97


Hi everyone! Welcome to another Paper Cutz Challenge! This challenge is a color challenge using ONLY the colors pink, white and orange! That's it. Any theme is ok. So, get busy and make your own card, layout or papercraft project and link it up at the PCC for a chance to win a prize!

My card is fairly simple, but looks very cute, if I do say so myself. I took some orange and pink gingham paper and cut these squares, then cut these circles in orange and pink cardstock. I ran those through my Swiss Dots embossing folder and inked the edges. The flowers are punched with Marvy punches. I punched the small flower first, then took a larger flower punch and punced out the open flowers. I ran the small flowers through the Swiss Dots folder and inked all of the edges on the flowers. I punched the circles out of cardstock for the flower centers and inked them as well. I added these gems from Hobby Lobby to add some bling. I layered the card together, pop-dotting the small flowers to add some dimension to my card. The sentiment is embossed with detail black and I added the small diamond to finish off my card.

Saturday, June 4, 2011

Paper Cutz Challenge and Two Takes on One Product


Hey everyone! This weeks challenge at Mary's blog is to do a card or project with a beach theme. I decided that I wanted to use a really pretty shell stamp that I bought last year and that I wanted to play around with my Tim Holtz Perfect Pearls a little. I LOVE these things! I need to get more colors. It's amazing to me how many different looks you can get with one product. These are definitely worth the money! They have lots of uses and a little product goes a long way. Only one of my projects ended up on Mary's blog because I hadn't finished the second one yet, but I will be sharing them both with you today. The Father's Day card shows the Perfect Pearls used dry on clear embossing ink. The black seashell card shows what happens when you use the product with water. Two very different, beautiful, and dramatic looks, don't you think? If yoh have any questions let me know. I can give instructions. There are also several great tutorials for Perfect Pearls on Youtube. Have a great day!